
When a clinical laboratory brings a new measurement procedure into service, it has to show the method performs acceptably in its own laboratory. The laboratory does not have to re-derive the manufacturer’s performance characteristics from first principles, because that work was done during development. What the laboratory needs is verification: confirmation that the claimed precision and trueness hold with its own instruments, operators and environment. CLSI EP15-A3 is the protocol for that, at a fraction of the work of a full establishment study.
EP05-A3 is the protocol for establishing precision and EP15-A3 the protocol for verifying it. Establishing means characterising precision from scratch across a full nested design of days, runs and replicates, which is normally the manufacturer’s job. Verifying means confirming that a stated claim holds in your laboratory, which is yours.
| EP05-A3 (establish) | EP15-A3 (verify) | |
|---|---|---|
| Who | Manufacturer / developer | User laboratory |
| Purpose | Characterise precision from scratch | Confirm the claim holds in your own laboratory |
| Typical design | ~20 days, nested runs and replicates | 5 days × 5 replicates (per EP15-A3) |
| Output | Repeatability through to reproducibility components | Repeatability and within-laboratory precision, against the claim |
| Decision | — | Observed imprecision within the verification limit? |
A twenty-day establishment study to bring a well-characterised assay into service spends a great deal of effort confirming what the manufacturer has already documented. Verify unless you have a specific reason to establish.
The deciding factor is modification. A cleared assay run exactly as the instructions specify already has established precision claims, so you verify them. Change something about how you use it and those claims no longer describe what you are doing, so you must establish precision yourself.
| Your method is… | You… |
|---|---|
| FDA-cleared or CE-marked, used exactly as the instructions specify | Verify (EP15-A3) |
| Laboratory-developed, modified from its cleared use, or used off-label | Establish (EP05-A3) |
Changes to the specimen type, the platform, the dilution or the intended use all count as modifications. When you are unsure whether a change counts, treat it as one. Establishing unnecessarily costs you effort, but verifying a method that needed establishing leaves a performance gap you never measured. The same distinction runs more broadly through validation versus verification.
EP15-A3 folds precision and trueness verification into a single short study. The design is compact: five replicates of each sample per day, over five days, at two or more concentrations spanning the measuring interval. Each level therefore gets 25 measurements. From those data you estimate two precision components. Repeatability is the within-run scatter of replicates measured close together. Within-laboratory precision, also called intermediate precision, is the total day-to-day variation your laboratory will see. The manufacturer’s claim is stated for these two figures, so these are the two you verify.
The two are often confused, and the difference decides which number you quote. Repeatability covers replicates measured under conditions held as constant as possible: one run, one operator, one calibration, close together in time. Intermediate precision adds the variation that accumulates between runs and between days — recalibration, a fresh reagent vial, a different operator, ordinary environmental drift. Repeatability is never the larger of the two, and quoting it as the method’s precision understates what a laboratory sees day to day. Intermediate precision is the figure that describes a reported patient result. See the precision components for the full hierarchy and the arithmetic that combines them.
Screen for outliers first. A generalised ESD test identifies aberrant replicates that would otherwise inflate your estimates. A single faulty measurement can fail an otherwise sound verification.
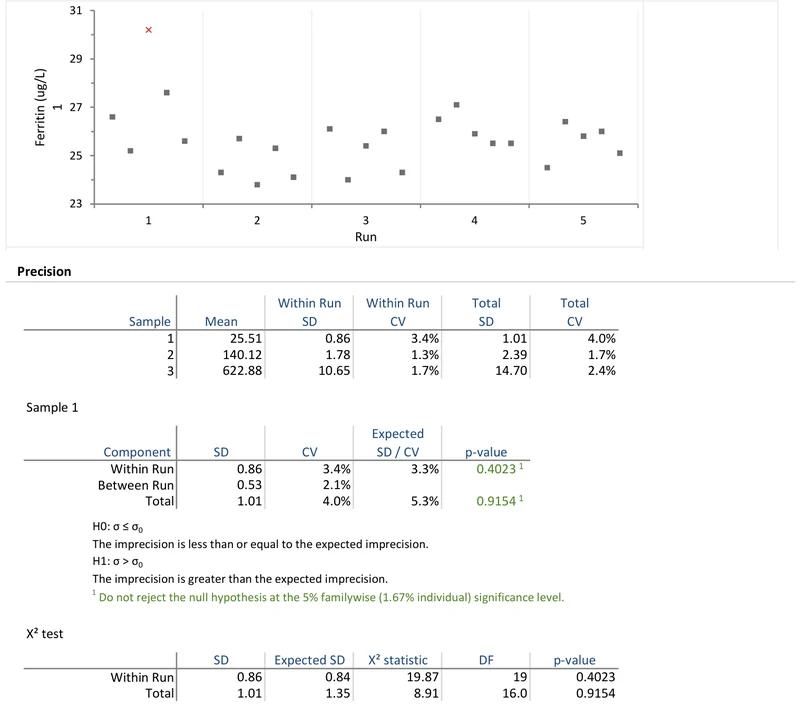
Verification is a one-sided question: is your observed imprecision consistent with the claim, or meaningfully worse than it? Your estimate comes from a small sample, so it carries real uncertainty. An observed SD slightly above the claimed value does not automatically mean the claim is broken.
EP15-A3 handles this uncertainty with an upper verification limit, derived from the claimed SD and the degrees of freedom in your study using the χ² distribution. An observed SD above the limit is larger than sampling noise alone would explain. A one-sided χ² test of the SD against the claim, at the same significance level, gives the same decision.
If your observed imprecision falls at or below the limit, the claim is verified. If it exceeds the limit, the difference is unlikely to be chance and the claim is not verified in your laboratory. The limit is the correct statistical answer to “is my SD close enough to theirs?” The reason is that the limit allows for a five-day study being unable to estimate an SD precisely.
EP15-A3 also covers trueness: systematic bias against an assigned value, such as that of a reference material, a proficiency-testing or EQA material, or a peer-group mean. You estimate the bias with a confidence interval and test it against your allowable bias. An equality test asks whether bias is present. An equivalence test asks whether any bias is small enough not to matter clinically. Running precision and trueness together in one study is the efficiency EP15 was designed to deliver.
A failed verification is a result to investigate, not a study to write off. Work through the likely causes before you accept or reject the method.
First, look for an outlier the ESD screen may have missed. Also look for a procedural cause, such as an operator unfamiliar with the assay, a reagent lot issue or an instrument not fully settled. A single bad day can fail a five-day study.
Second, consider whether the claim was established under conditions you have not reproduced: a single reagent lot, one calibrator lot, expert operators. The verification limit allows for the sampling uncertainty of a five-day study but not for a difference in conditions, so compare the conditions before you conclude.
Third, imprecision that is repeatable and clearly worse than claimed is a real finding. Report it to the manufacturer with your data rather than accepting the method as it stands.
What you should not do is widen your goal after the fact to make a failure pass. The verification limit exists so that decision is made on the statistics, not on hope.
Two worked examples, ready to open in the Analyse-it trial:
The example workbook is downloading.
It opens in Excel on its own — the data and the finished results are both in it. Analyse-it is what lets you change the analysis and re-run it, try the same study on your own data, or work through it to see how the software handles it.
Every feature from all five editions for 15 days.
Running EP05 when EP15 would do. Establishing precision from scratch to bring a documented assay online is effort in the wrong place. Verify unless you specifically need to establish.
Verifying a modified or laboratory-developed test. The more dangerous error. If the manufacturer’s claims do not apply to your use, a short verification confirms nothing meaningful. The method needs a full establishment study.
Deciding after collecting data. Establishment and verification have different designs and sample sizes. Settle which you are doing before the first run, not after.
Comparing observed SD to the claim by eye. “Ours is a bit higher, close enough” is not a decision rule. Use the upper verification limit. The limit tells you whether the difference exceeds the sampling noise a small study inevitably carries.
Skipping the outlier screen. One aberrant replicate can fail a verification that the method would otherwise pass. Run the ESD screen before you judge the result.
Verifying precision but forgetting trueness. EP15 covers both in one study. Confirming imprecision while leaving bias unexamined answers only half the question the method needs to satisfy.
Relaxing the limit after a failure. Relaxing the allowable imprecision to convert a fail into a pass defeats the purpose of verifying at all. Investigate the cause instead.
Analyse-it runs the EP15-A3 verification on your own data, inside Excel:
Every feature from all five editions for 15 days. Precision and trueness verification is in the Method Validation and Ultimate editions, from US$ 475 a year. Validated against NIST and CLSI reference datasets. Full detail in the precision reference guide.