
Before a laboratory can report a patient result from a new method, it has to show the method performs acceptably on its own instruments, with its own staff. How much work that takes comes down to one question, and the question is easy to get wrong. Are you verifying a method someone else has already characterised? Or validating one whose performance you have to establish yourself?
Answer wrong in one direction and you waste weeks proving what the manufacturer already documented. Answer wrong in the other and you put a method into service that you never properly evaluated.
Verification is confirming that a method whose performance has already been established lives up to its stated claims on your instruments, with your staff, in your environment. The typical case is an FDA-cleared or CE-marked assay, used exactly as the manufacturer intended. The manufacturer did the heavy characterisation during development. You are checking that it holds.
Validation is establishing performance characteristics from scratch, because no one has done it for your intended use. Validation applies to a laboratory-developed test, an assay you have modified or one you are using outside its cleared indications. Here there are no claims to confirm. You have to generate the evidence yourself, across a wider set of characteristics and larger studies.
The distinction is simple: verification confirms someone else’s numbers, and validation produces your own. Verification is a fraction of the work, but only if you are entitled to it.
| Your method is… | You must… |
|---|---|
| FDA-cleared or CE-marked, used unmodified per the instructions for use | Verify the manufacturer’s claims |
| Laboratory-developed, modified from its cleared use, or used off-label | Validate — establish performance from scratch |
The deciding factor is whether the assay is used exactly as cleared. A cleared assay run on a different specimen type, at a different dilution or on an unapproved instrument has been modified. Modification moves you from verification to validation. When in doubt, treat any change from the cleared use as a modification.
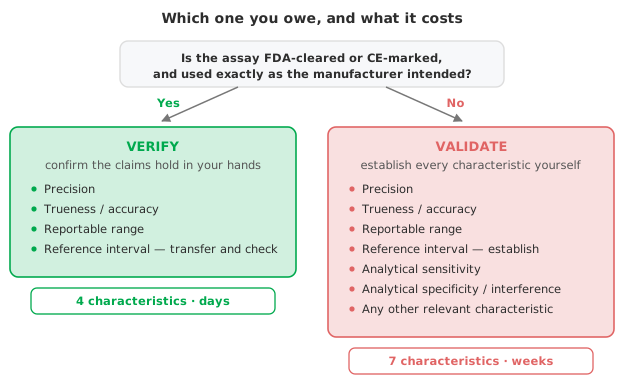
A verification confirms the claims that matter for reporting results: precision, trueness, the reportable range and the reference interval. The work is deliberately compact, a handful of days rather than weeks, because you are checking established numbers rather than deriving them. In practice that means:
Validation covers everything verification does, but establishes each characteristic rather than confirming it. Validation also adds the analytical characteristics a manufacturer would have generated during development:
The distinction is not just good practice. The frameworks laboratories are inspected against are written around it.
Under the Clinical Laboratory Improvement Amendments (CLIA) in the US, an unmodified FDA-cleared assay requires verification of accuracy, precision, reportable range and reference intervals before reporting. A modified or laboratory-developed high-complexity test requires more: establishing analytical sensitivity, analytical specificity and other characteristics as well. ISO 15189 and the checklists of the College of American Pathologists (CAP) draw the same line.
Which side of that line your method falls on determines what an inspector will expect to see in your file. Settle the question before you start collecting data, not after.
Validating an unmodified cleared assay. Running a full establishment study for a method the manufacturer has already characterised is weeks of effort spent confirming documented claims. Verify unless something about your use is non-standard.
Verifying when you should have validated. The more dangerous error: treating a modified or laboratory-developed test as if a short verification suffices. If you changed the specimen, the platform or the intended use, the manufacturer’s claims no longer apply and you need a full validation.
Skipping the reference interval. Precision and trueness get the attention, but reporting a manufacturer’s reference interval without at least verifying it transfers to your population is a common inspection finding.
Deciding after the fact. Whether you are validating or verifying determines your study design and sample sizes. Settle it first. Discovering mid-study that you under-powered a validation is expensive.
Analyse-it performs the statistics for most of the validation and verification studies against the CLSI EP protocols, inside Excel:
Every feature from all five editions for 15 days. These are in the Method Validation and Ultimate editions, from US$ 475 a year. Go to the guide for the task in front of you once you know which path you are on. The task may be verifying precision claims, choosing a method-comparison regression, reference intervals, detection capability or diagnostic performance. For the regulatory framing, see what CLIA requires before you report a result or method validation under ICH Q2(R2). Either path ends in a document: what goes in a validation report.